Data Engineering 101: Integrating MongoDB and Treasure Data
Data Engineering 101: Integrating MongoDB and Treasure Data
Data Engineering 101: Integrating MongoDB and Treasure Data

When trying out different database or data storage backends, the choice of which to use – and for which part of your architecture – can be a tradeoff: Do I want excellent latency control, or do I need literally effortless – and potentially infinite – scalability? Do I prefer to work with a sharding and implementation strategy in order to run lightning fast on bare metal, or can a tolerate a few extra milliseconds of latency to enjoy the benefits of automatic scaling overhead in the cloud? Am I building a one-off app that works well as a standalone, or do I need to scale massively from the get go? Do I prefer to ramp up my engineers to a powerful new query paradigm, leveraging Mongo’s impressive and helpful community, or am I comfortable enough with the knowledge transfer from SQL to its emerging and popular big data counterparts such as Presto and Hive?
Between MongoDB and Treasure Data, each has its relative strengths, and to leverage the best each has to offer – for whatever your purposes – it’s useful to know how to connect the two. Fortunately, as we’ll see below, it’s quite easy.
There are essentially two different kind of architectures to consider when integrating MongoDB and Treasure Data.
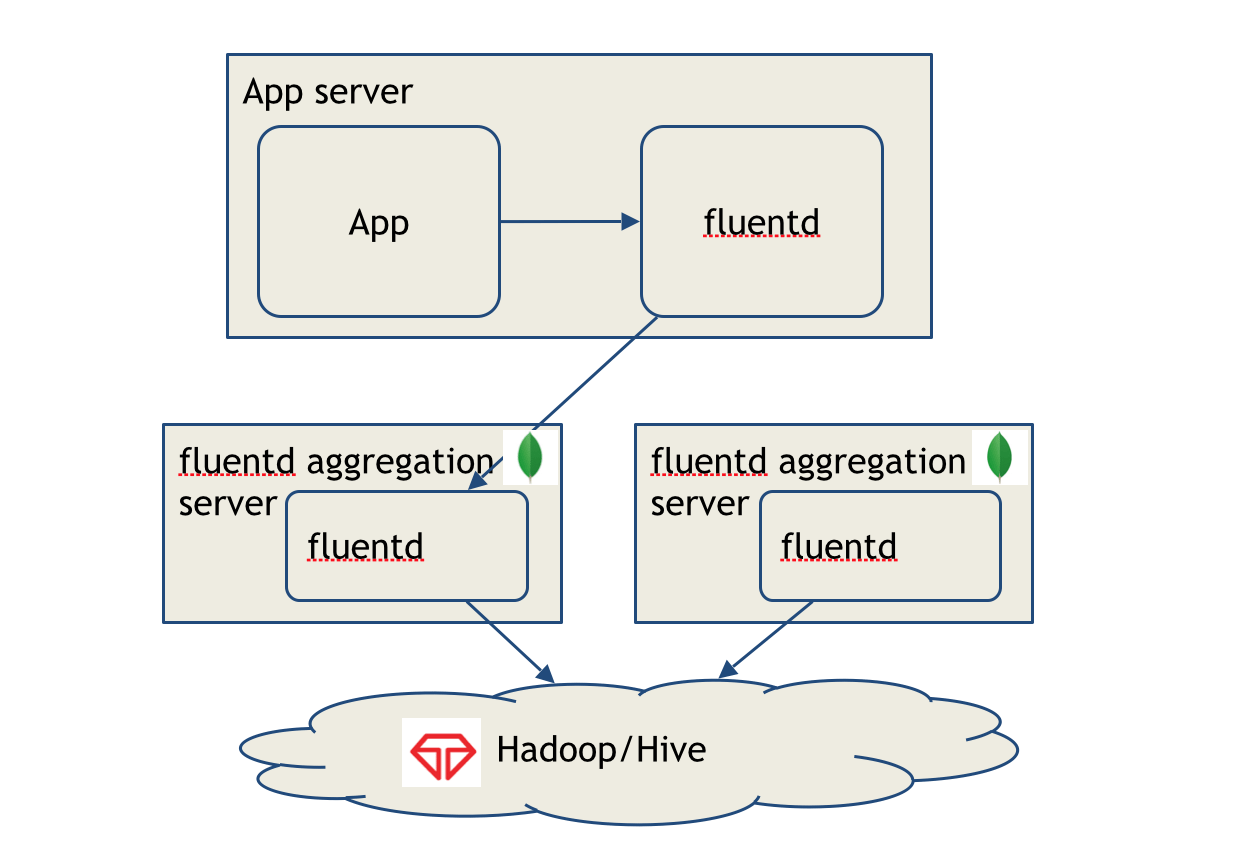
In one scenario, we ingest data into MongoDB streaming directly from our application, then export it with a tool like Fluentd into Treasure Data for processing and storage. In this scenario, MongoDB’s lightning fast latency helps us with exploratory queries on data we’ve just collected, while Treasure Data’s high scalability serves as the data point for data for posterity. As our data set grows to billions, or even trillions of rows, we can leverage the power of Presto and Hive to run queries that support analytics for longer-term trends.
In another scenario, we ingest data directly from our app into Treasure Data using the appropriate programming language SDK, then query it and export the query results to MongoDB for analytics. Based on a presentation and demo I gave for MongoDB SF User Group on June 17, we’ll explore this second scenario.

In order to demonstrate this latter scenario end-to-end, we’ll need a few pieces to get started.
- An app with events that we can ingest into Treasure Data
- An account at www.treasuredata.com, and a Master API key
- A MongoDB instance set up in the cloud.
We’ll go through setting up each component and running our integration end-to-end in the following steps.
Setting up our Treasure Data account and CLI (Toolbelt)
Setting up our MongoDB instance
Setting up and running our app to ingest events
Viewing/Querying our events in Treasure Data Console and Exporting results to MongoDB
Viewing results in MongoDB
Setting up our Treasure Data account and CLI (Toolbelt)
You can learn basic concepts as well as how to set up a basic Treasure Data account (with Console) here.
Setting up and learning how to use Treasure Data CLI (Toolbelt) is easy too.
Setting up our MongoDB instance
This is a bit trickier since, for running MongoDB remotely, there are a few different alternatives, not all of them fully vetted.
I set up my own instance on AWS. There are a few options for this:
One simple way to create MongoDB instance on AWS might be creating instances from a MongoDB IAM instance role:
https://aws.amazon.com/blogs/aws/mongodb-on-the-aws-cloud-new-quick-start-reference-deployment/
If you want to install and configure MongoDB manually, I recommend the following resource:
http://docs.mongodb.org/ecosystem/platforms/amazon-ec2/
Also, If you want to install MongoDB instances from scratch, you’ll need to create EC2 instances based on:
http://docs.aws.amazon.com/AWSEC2/latest/UserGuide/EC2_GetStarted.html
After you create your EC2 instances, you can install and run MongoDB instances based on:
http://docs.mongodb.org/manual/administration/install-on-linux/
I followed the third option and installed Ubuntu and MongoDB 3.x on it. For my demo installation, I don’t need to consider production configurations, sharding or replication.
However, you can also try MongoLab. Their UI is extremely intuitive and pretty self-explanatory. After you’ve created your database and collection, under the path …/databases/<your_database>#collections, you’ll see the URI information for connecting remotely at the top of the page. You can plug this into Treasure Data later.
Setting up and running our app to ingest events
After setting up the basics, we’ll want to have an app that ingests data to Treasure Data. In order to do this, we’ll need an application that can log events.
An example of such an app can be found here.
This app mimics the data sent from an iBeacon. (An iBeacon is Apple’s version of the Bluetooth-based beacon concept, which allows Bluetooth devices to broadcast and receive information within short distances.) iBeacon data can tell us different things about the types of users with smartphones who are in range of the beacons.
Note that the script runs on Ruby and, when using Treasure Data’s Ruby SDK, requires only the ‘td’ gem ($ gem install td ). This script does a few things:
- Takes the api_key as an argument
- Takes the iterator as an argument. This tells you the number of rows to add to the table.
- Returns the standard UUID (ID of the device), plus major and minor values (major and minor beacons are placed in a retail space to triangulate the location of the device), along with a few other values, including RSSI (received signal strength indication).
- MOST IMPORTANTLY: logs events to Treasure Data with:
TD.event.post('events', {proximity: proximity_var, minor: minor_var, rssi: rssi_var, uuid: uuid_var, accuracy: accuracy_var_float, major: major_var, measuredPower: measuredPower_var}) - Flushes the buffer and uploads events with
TreasureData::Logger.logger.flush()
command.
Try running the app in your terminal with the following command:
$ ruby ibeacon_simulator.rb “5919/xxxxxxxxxxxxxxxxxxxxxxxxxxxxxxxxxxxxxxxx” 500
Be sure to substitute in your write API key.
Viewing/Querying our events in Treasure Data Console and Exporting results to MongoDB
Now comes the fun part. Now that our app has imported data into Treasure Data, it’s time to query and export result sets into MongoDB.
In this example, to keep things simple, we’ve merely queried all events. A couple of points of note.

- We’ve set up console to export to “MongoDB” . The “Host:” parameter should point to your AWS or MongoLab instance.
- On your MongoDB instance, you’ll need to create a user and password for the database; Treasure Data will use these credentials to connect.
- Lastly, create the “aws_mongo” database, a collection called “ibeacon_data”, and append your data to the collection.
- Each row in your Treasure Data database will correspond to a document on the MongoDB instance.
Run your query. I’ve created the query
select time, uuid, measuredpower from events limit 50
because that’s the data I’m interested in.
Viewing results in MongoDB
Your results should generally show up quite quickly in MongoDB. If you are running on a local terminal, you’ll need to connect to the remote instance first.
$ mongo ec2-54-204-235-XX.compute-1.amazonaws.com
Next, you’ll want to connect to the mongoDB database to which your data is exported
> use aws_mongo
(if you haven’t already done so, you’ll need to create your collection and export data to it.)
> db.createCollection(“ibeacon_data”)
Then, run your query on Treasure Data again.
Now, on MongoDB, query your collection to see how it’s populated.
> db[“ibeacon_data”].find()
or
> db.getCollection(“ibeacon_data”).find()

That’s the long and short of it. From this point, you can use MongoDB, for example, for a variety of tasks related to analytics and short-term aggregation of data (for more on that, you’ll want to refer to MongoDB documentation and examples). You can configure the Treasure Data query to change the data coming in, you can change the destination database, and you can even change the format of the data!
Sometimes, it might be necessary to bring your environment to a refreshed state. You may want to remove your databases, tables, and/or collections from both MongoDB and Treasure Data and start from scratch.
To delete our databases on Treasure Data, using the CLI:
$ td db:delete -f ibeacon_test
To delete our database from our MongoDB, (assuming we’re connected to our AWS instance):
> use aws_mongo #make sure you’re switched to the database
> db.dropDatabase()
To keep the database but delete just the our ibeacon_data documents from MongoDB, (assuming we’re connected to our AWS instance):
> use aws_mongo #make sure you’re switched to the database
> db.ibeacon_data.remove({})
There’s a cheat sheet included in this tutorial’s github repo. Thanks to Dongmin Yu for his AWS and MongoDB debugging help. Have fun!