Analyzing Landsat Data with Treasure Data and Amazon S3
Analyzing Landsat Data with Treasure Data and Amazon S3
Analyzing Landsat Data with Treasure Data and Amazon S3
As a data scientist (or would-be dabbler), you’ll want to get a handle on pulling data from open data from public sources. More and more, those sources can be found in Amazon S3 buckets. Treasure Data now offers a connector for S3, so you can pull down public data sets from S3 buckets as *tsv and *csv files (even if compressed), and start querying them!
In this short tutorial, we will:
- connect to a public source on an an Amazon S3 bucket
- Import it into a local Treasure Data instance
- Explore the data
- Run some basis analytic queries against the data

This quick tutorial assumes you’re already set up with a Treasure Data account and Treasure Data toolbelt. You will also want to set up an AWS account . Sign up and make a note of your aws access key id and secret_access_key (note: you shouldn’t need them for this exercise, but good to have them just in case).
![]()
You can find datasets on Amazon to explore here http://aws.amazon.com/public-data-sets/.
Specifically, there are many things you can do with landsat data, available on s3 at s3://landsat-pds/.
In this short piece, we’ll focus on retrieving landsat data and making a few small manipulations using first Hive and then Presto.
Treasure Data tools are largely built in, and thus speak, Ruby. Although not Ruby specific, one of the programming language constructs that is therefore used a lot is the YAML (Yet Another Markup Language) serialization file, which is commonly used with Ruby.
Create a directory in your file system that you want to use and cd into it.
Next, create a file, seed.yml. You must also specify bucket name, and target file name (path to the *.csv or *.tsv file on your S3 bucket):
config:
  in:
    type: s3
    access_key_id:
    secret_access_key:
    bucket: landsat-pds
    path_prefix: scene_list.gz
  out:
    mode: append
Note: at press time, we are building a new version of the connector that doesn’t require access_key_id or secret_access_key. So please try this step while leaving these values blank.
Next use connector:guess to automatically read the target file, and intelligently guess the file format.
$ td connector:guess seed.yml -o load.yml
The file format is then loaded into a file called load.yml. This file will dictate what the column headers in the table will be, along with the format of the file. You can see into the file with a simple cat command:
johnhammink$ cat load.yml
—
config:
in:
type: s3
access_key_id:
secret_access_key:
bucket: landsat-pds
path_prefix: scene_list.gz
decoders:
– type: gzip
parser:
charset: UTF-8
newline: CRLF
type: csv
delimiter: ‘,’
…
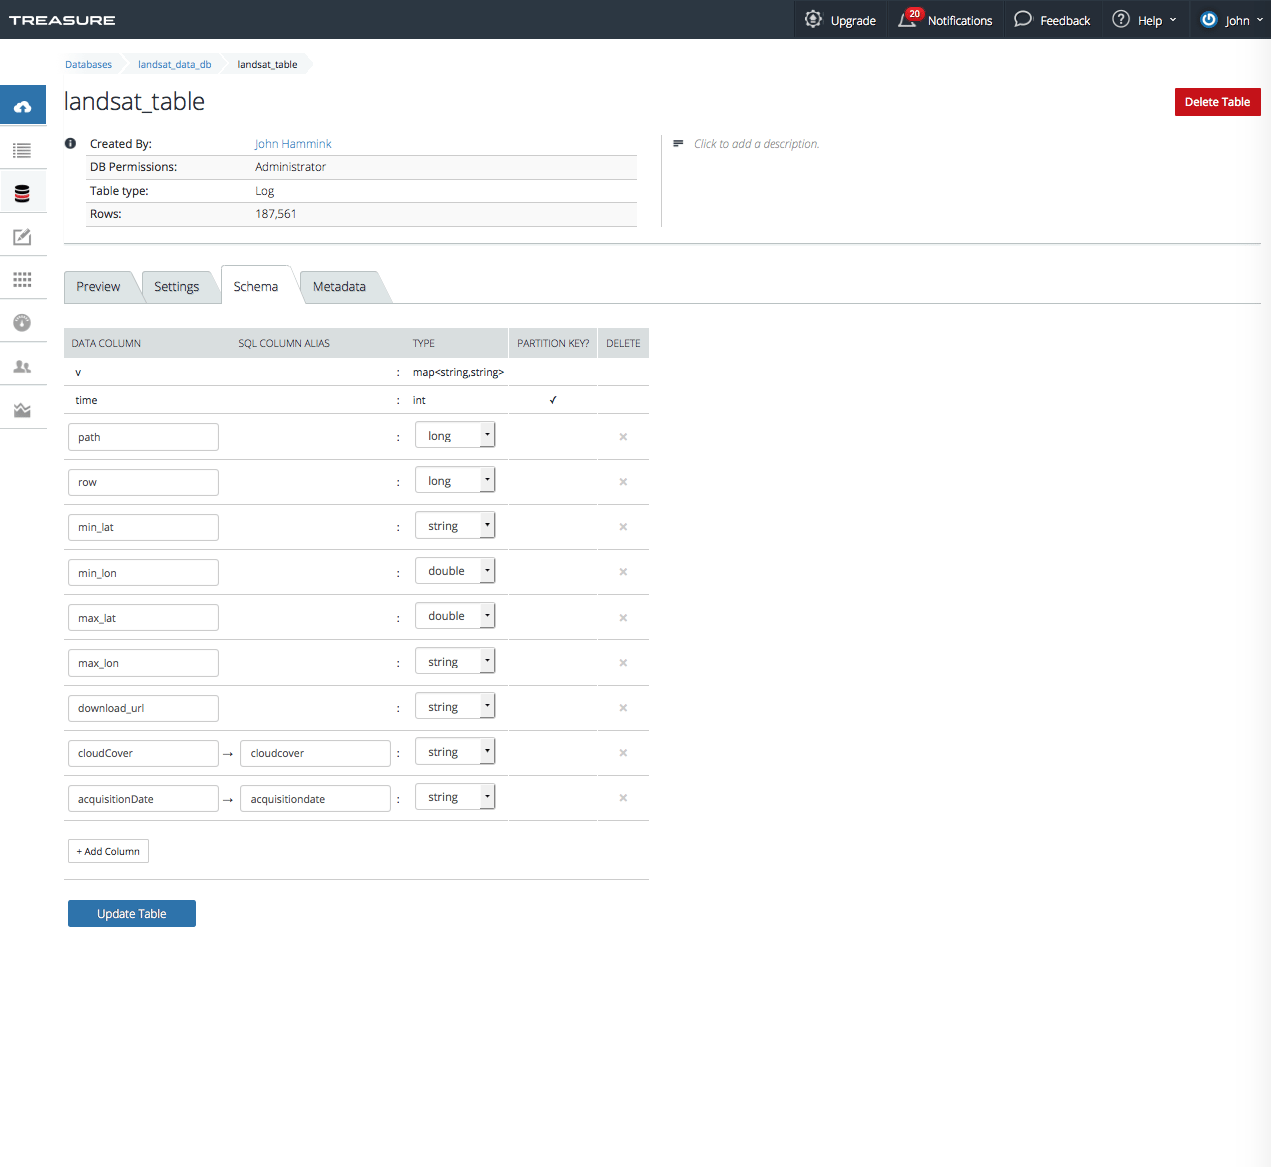
What’s actually interesting in this case are the column headers, shown in the ‘columns’ section: entityId, acquisitionDate, cloudCover, processingLevel, row, min_lat, min_lon, max_lat, max_lon, download_url. Note that many of the column headers are mixed case. This will become important later, as we’ll need to make an adjustment to these column names in Treasure Data console.
The system will allow us to preview the file by using the preview command.
$ td connector:preview load.yml

Before we import the data to Treasure Data, we’ll need to create databases and database tables into which we’ll import the data:
$ td database:create landsat_data_db
$ td table:create landsat_data_db landsat_table
Next, we’ll do the actual load into our database. Treasure Data depends on time series data, so we need to specify also a time column (if you copy and paste this command please remove the spaces between the leading dashes):
$ td connector:issue load.yml – -database landsat_data_db – -table landsat_table – -time-column acquisitionDate
That’s it! Once the buffer is uploaded, we can query our data from either Treasure Data CLI or Treasure Data Console: try it!
$ td query -w -d landsat_data_db “SELECT * from landsat_table”
What’s interesting to us for each record is the download_url, which contains an image related to the record.
This one, at https://s3-us-west-2.amazonaws.com/landsat-pds/L8/010/117/LC80101172015002LGN00/index.html had a cloud cover of > 80 as of presstime, and at that time, we couldn’t make out any ground features in the image (note that this image is updated dynamically and changes from time to time. It might look different here).

This one, at https://s3-us-west-2.amazonaws.com/landsat-pds/L8/195/029/LC81950292015002LGN00/index.html has a cloud cover of 21.02 and we can start to make out features, but it’s still not great:

Generally speaking, if the cloud cover on the image is > 20, we really can’t see anything in the image, so let’s use Hive to pull up complete landsat records where the cloud cover is less than that.
$ td query -w -d landsat_data_db “SELECT * from landsat_table where v[‘cloudCover’] < 20”
It’s easy to do a little more investigation here. What percentage of the landsat images are uncloudy enough to to navigate?
First, let’s count the total number of landsat images. Since we’re just exploring, and we want to optimize our performance for that, let’s use Presto engine (Hive is default):
$ td query -w -T presto -d landsat_data_db “SELECT count(1) from landsat_table”
This returns (eventually):
+——–+
| _col0 |
+——–+
| 187561 |
+——–+
NOTE: For this tutorial, I needed to use Treasure Data Console schema editor to convert cloudCover data column to one that TD CLI can read in all lowercase, namely cloudcover . This is a known issue and will be addressed in a later version of the product.
Let’s run a query, similar to our earlier one, to count the number of images available with a cloudcover < 20:
$ td query -w -T presto -d landsat_data_db “SELECT * from landsat_table where try_cast(cloudcover as double) < 20”
This returns 96774 . Tallying up, (at the time this blog was published) this comes to 51.57% of our currently available landsat images being clear enough to at least reasonably discern ground features.
If you’ll pardon the pun, the more we explore, the more ways we discover to do things (not to mention the more we can discover to do!) so keep watching this blog! And we’re always open to comments. Let us know what you’d like to see!
Keep in mind that these tools (and the workflow behind them) are continually works in progress. To that end, please leave a comment if you notice any commands appear outdated or do not work to spec.
Join us at Silicon Valley Data Engineering!
Interested in Data Science? Data Engineering? Check out our Silicon Valley Data Engineering group!