Getting Direct, SQL Access to Your Mixpanel Data in 6 Easy Steps
Getting Direct, SQL Access to Your Mixpanel Data in 6 Easy Steps
Getting Direct, SQL Access to Your Mixpanel Data in 6 Easy Steps
I have a love hate relationship with Mixpanel.
The love part is fairly obvious: Mixpanel allows users to create funnels with minimal technical integrations, and its visualization and reporting functionality have improved tremendously over the years. Interested in which campaign is performing best in terms of conversion rate for a particular funnel? Click, click, BAM! How about looking at trended conversion rates broken down by weekly cohorts? Click, click, BAM!
As for the hate part, it’s a bit more subtle but it surfaces when you get to this: click, click, click, Google, click, scroll, back, Google again, click…before you realize that one question you need an answer for cannot be easily answered with Mixpanel.
Blocked by Mixpanel’s inflexibility, you start asking your data engineers for raw access to Mixpanel data. But data engineers are busy and any change they make can take days, or even weeks. So what do you do? You decide to do this on your own…
Sound familiar? If you’ve been nodding thus far, then you came to the right place. I will show you how to get event-by-event access to all your Mixpanel data with a SQL interface. As an added bonus, you can export all this data into various systems such as PostgreSQL, Redshift, S3, Tableau and so on.
 Mixpanel + Treasure Data Architecture
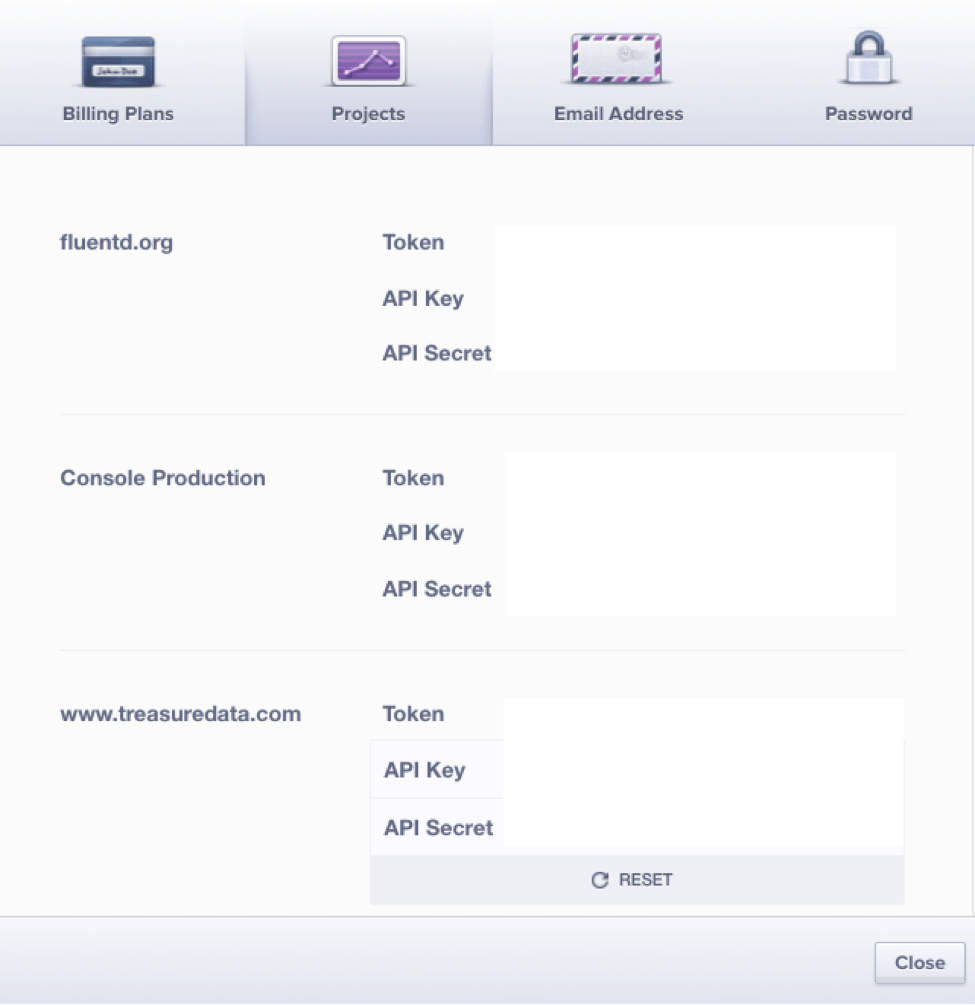
Step 1: Get Your Mixpanel API Key and Secret
To access your API key, log into your Mixpanel account and click the Account tab to display a modal popup window. Click the Projects tab to display your API key and API secret:
Step 2: Get Your Treasure Data API key
Sign up for Treasure Data for free. Once you are signed up, download the command line tool from here.
You can check that the command line tool is installed by running the following command from your shell (Terminal.app if you are on OSX):
td –version
0.12.0
Now, from command line, log into Treasure Data by running the following command and typing in your email and password:
Step 3: Write seed.yml and Generate Configuration File
Create a YAML file (seed.yml) that looks like:
in:
type: mixpanel
api_key: “YOUR_MIXPANEL_APIKEY”
api_secret: “YOUR_MIXPANEL_SECRET”
timezone: ‘UTC’
from_date: “2015-10-28”
fetch_days: 1
out:
mode: append
A quick explanation on the YAML file:
- from_date: This specifies the first date of your Mixpanel events that you wish to import.
- fetch_days: This specifies the number of days of data you wish to import.
- mode: This specifies how you want to insert data into Treasure Data. Here, we are appending new incremental data.
So, in the example seed.yml file above, we are importing one full day of data on Oct 28, 2015.
Once you have your seed.yml file, you can run “td connector:guess seed.yml -o load.yml”. Treasure Data is smart enough to look at your sample events and automatically generate the full configuration file:

Step 4: Load Your Data
With the full configuration file (load.yml) in hand, we are ready to import the data. First, create a database called “mixpanel” with a table called “my_project”. Feel free to replace these names with names of your choice (These steps can be done inside our console as well).

Then, load the data with “td connector:issue load.yml –database mixpanel –table my_project –wait”. Again, you can use your own database and table names. If you are storing a lot of events in Mixpanel, this step might take a while. In which case, you can run it without “–wait” and retrieve the status of your job with “td job:show <job_id>”

Success!
Step 5: Event-by-Event Access with SQL, Download as CSV
Finally, check that your data is there. You can run the following query to get the first 10 events:

And now you have direct, raw access to your data on your laptop as a CSV file (we also support tsv and json-per-line).
Step 6: Automating Your Incremental Export
All of this is cool, but in a real world use case, you need to automate incremental export of your Mixpanel data. Treasure Data supports this by creating scheduled executions: It’s smart enough to know what the next execution should look like based on the current execution. In our case, the next execution will run with “from_date: ‘2015-10-29’ with “fetch_days: 1” to load the Mixpanel events from the subsequent date. Had you configure seed.yml with “fetch_days: 7” to get a weekly dump, the next run would have “from-date: ‘2015-11-04’” with “fetch_days: 7”.
For our current example, we wish to run this as a daily job with “td connector:create daily_mixpanel_dump “0 0 * * *” mixpanel my_project load.yml”. Optionally, you can specify the time zone with “–time-zone” (It’s UTC by default).

What’s Next?
Congratulations. Now you have a data pipeline that lets you access your Mixpanel data event-by-event using SQL. The really cool thing about Treasure Data is that it lets you connect your query results to various output systems. We’ve already seen that you can download query results as CSV/TSV, but in addition, we have dozens of integrations, including PostgreSQL/MySQL, Google Sheets, Tableau, Looker, and so on.
Mixpanel definitely has its place in analytics. I continue to use it daily. But the ability to access your raw event data without paying a fortune is priceless =)
Thinking of taking your analytics to the next stage? Schedule a quick chat with our analytics experts. We will help you bring all data in one place.