Move your data – from MySQL to Amazon Redshift (in less time than it takes to ignore an index!)
Move your data – from MySQL to Amazon Redshift (in less time than it takes to ignore an index!)
Move your data – from MySQL to Amazon Redshift (in less time than it takes to ignore an index!)
Redshift, as you may already know, is quickly gaining broad acceptance, especially among consumers of free software like MySQL and PostgreSQL, for its “pay as you go” pricing model. However, the same pricing model can still make it a very expensive one. Not all queries need to be done against the Redshift instance itself, as it turns out, and not running these queries directly on your Redshift instance can save you a lot of money. Nonetheless, many DBAs familiar with MySQL will soon need a quick and effective migration path to Redshift.
Migration looks something like this:
- Extract (dump) the data from MySQL;
- Load the data into Redshift.
- Enjoy!
- Rinse, lather, repeat (especially with a very large dataset – you won’t be able to move all of the data in one go)!
But actually, there’s more to it:
- After I’ve extracted the data dump from MySQL, where do I store it before importing it to Redshift?
- What about schema- and type- compatibility issues? The two database types share some, but not all, of the same data types. What’s more, while Redshift can be thought of as a petabyte-scale version of Postgres (albeit, with significant changes), MySQL has its own MPP database, called ShardQuery, which works quite differently in fundamental ways.
- How can I automate the process? More than likely, you won’t be doing all the database migration in one go.

So here’s the thing. Thinking traditionally, you may need to actually do something like this:
- Create a Redshift cluster.
- Export MySQL data, using an export query, and split them into multiple files.
- Upload the load files to Amazon S3.
- Run a COPY command (possibly in multiple iterations) to load the table.
- Verify that the data was loaded correctly.
As you might imagine, that’s A LOT of COPY commands and error-prone uploading when you’re talking billions of rows of data spread across multiple MySQL tables! Of course, you’d also better be sure that your export query is set up just right – trying to figure out exactly in which file something went wrong is the reason many DBAs change careers.
There’s an easier way.
Did you know you can address all of these issues by putting Treasure Data in the middle as a data lake and Redshift Ingestion funnel? Now you do.
- Treasure Data can store your database dumps from MySQL: With Treasure Data’s data connectors, you can easily dump – and store – your MySQL snapshots. We ingest up to 60 billion rows per day! What’s more, the connectors support SSL, so you know your data is secure.
- Treasure Data is schema-on-read: You can easily dump any strongly typed database snapshots without worrying about compatibility.
- Treasure Data can schedule jobs: You can automate – and schedule – pulling the data from MySQL as well as pushing the data into Redshift.
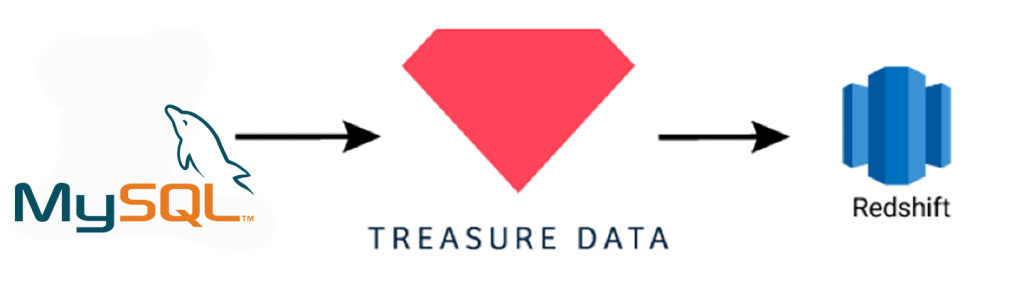
Migration: MySQL -> Treasure Data -> Redshift
We’ll assume the following:
- You have a MySQL database running on Amazon RDS. Your database should have at least one port accessible from Treasure Data API servers. You can configure your security group to do this.
- You have a Redshift instance running, also accessible from Treasure Data.
- You have installed and configured Treasure Data Toolbelt on your system.
Let’s get started. NOTE: All of the command line stuff can be automated in a shell script, bash script or scripting language of your choice using system libraries. We’ll show you also how to schedule below. Also, in keeping these instructions as general as possible, we’ve either provided example values where something might be unclear or have started the variable names with your_. Please send us your suggestions in the comments section.
- Create seed.yml. We’ll include SSL settings. This should contain information on the host and database you’ll be pulling your data from:
config: in: type: mysql host: your_mysql_host_name port: 3306 user: your_test_user password: your_test_password options: requreSSL: true useSSL: true verifyServerCertificate: false database: your_test_database table: your_test_table select: “*” #this selects everything out: mode: replace - ‘Guess’ the data.
$ td connector:guess seed.yml -o load.yml - Preview the data before loading it into Treasure Data. (Click the image to enlarge.)
$ td connector:preview load.yml

- Create the database and tables on Treasure Data. This is where you’ll dump your data from MySQL before you load it into Redshift.
$ td db:create your_treasure_data_database && td table:create your_treasure_data_database your_treasure_data_table - Load the data from MySQL into your Treasure Data table. Note that you’ll need to specify a –time-column if there isn’t one.
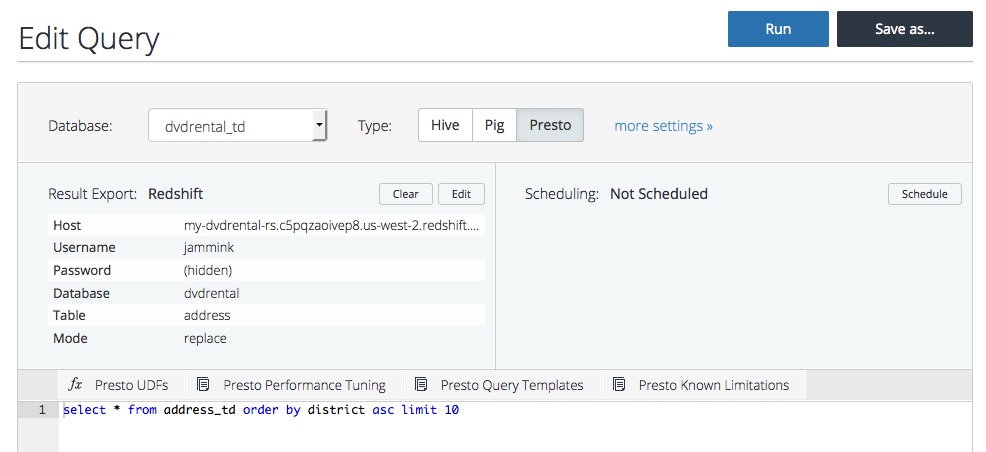
$ td connector:issue td-bulkload.yml –database your_treasure_data_database –table your_treasure_data_table –time-column your_timestamp_column - Now is the step where you query your data into the format you want to export to Redshift. Go to console.treasuredata.com and, for example, type out the query to get your first 20 items sorted by a value.
SELECT
   *
FROM
  your_treasure_data_table
ORDER BY
  your_value ASC LIMIT 20
- Set it up to send the query results to Redshift.
Host: my-amazon_host-rs.c5pqzaoivep8.us-west-2.redshift.amazonaws.com #Example
Username: your_amazon_redshift_username
Password: your_amazon_redshift_password
Database: your_amazon_redshift_database
Table: your_amazon_redshift_table
Mode: append
Method: insert - Run the query.
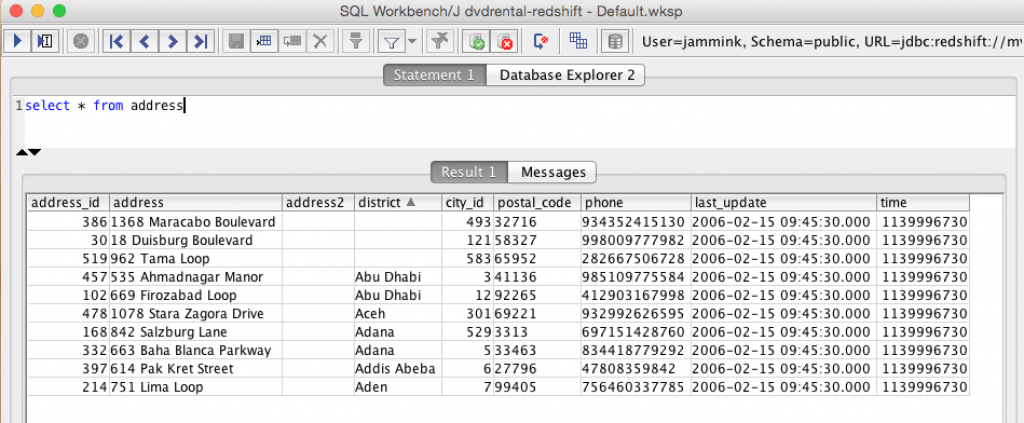
- View and query the results on Redshift. You can connect to your Redshift instance with SQL Workbench (or similar) and query your Redshift data.
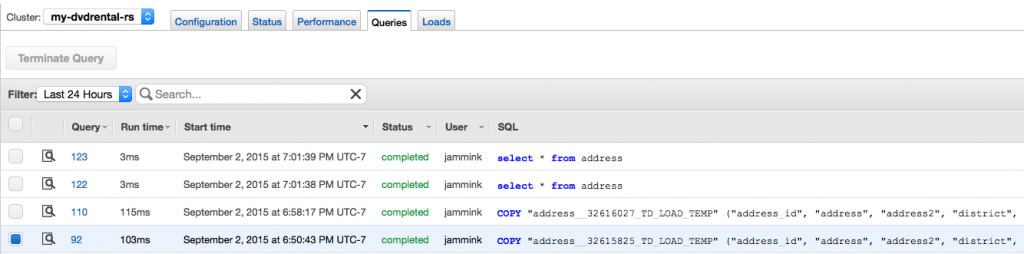
- You can also check your transaction log on Redshift. You will save money by needing to run fewer queries and transformations directly on Redshift.
- You can schedule an import using the td connector:create command. You’ll need the schedule, cron-style schedule, the database and table where their data will be stored, and the Data Connector configuration file, as follows:
$ td connector:create
daily_mysql_import
“10 0 * * *”
your_treasure_data_database
your_treasure_data_table
load.yml

Summing up
Treasure Data provides a great solution to simplify migration from MySQL to Redshift. With our cloud data lake, you can unify your analytics infrastructure and you can publish your results, to various target systems – not just Redshift!
Would you like to take a quick tour of our product? Click the link below
http://get.treasuredata.com/Data_Loading_Redshift.html
or attend the upcoming webinar.